October 2nd, 2007
Plastic spoons turn into turkeys for this fun craft. Preschoolers will have fun picking out the feathers and sticking them to the spoon. Place one in a flower pot and you have a great centerpiece for the classroom or on Thanksgiving Day!
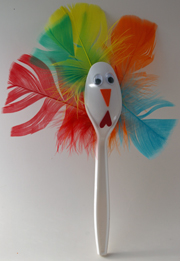
What You Need: Plastic spoon; assorted feathers; scrap of red cardstock or construction paper; heart punch for waddle (or just cut out waddle shape); scrap of orange cardstock or construction paper for beak; two googly eyes; scissors; glue; transparent tape.
How You Make It: Using glue or tape, stick assorted feathers into the hollow of the spoon. Use heart-shaped punch to make waddle from red paper or just cut out a shape (doesn’t have to be perfect!). Cut orange triangle for beak. Glue waddle, beak and googly eyes onto curved part of spoon.
Tags: Thanksgiving, turkey crafts
Posted in Thanksgiving crafts | No Comments »
September 27th, 2007
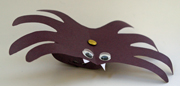
These spiders can be made as bracelets or rings. Preschoolers love wiggling them around. It’s even more fun because it’s made by tracing the child’s own hand!
What You Need: black construction paper; 2 googly eyes; office brad; white crayon; scrap of white paper; glue; scissors; stapler.
How You Make It: Fold construction paper in half. Have child place hand at fold, about halfway down the palm. Using white crayon, trace fingers (but not the thumb). Unfold and cut out. Use pencil or crayon to roll “legs” so they curl under a bit. Cut strip of black construction paper 1 inch wide and about 1″ longer than the child’s wrist. Staple ends together. Use brad to attach wrist loop to spider’s body. Glue on eyes and little triangles cut from white paper for fangs.
Tags: Halloween, handprint crafts, spider crafts
Posted in animal crafts, Halloween crafts | No Comments »
September 24th, 2007
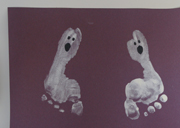
This is a quick, fun craft for preschoolers, and as a bonus you preserve their little feet at that age. Be sure to use washable tempera paint for easy cleanup.
What You Need: black construction paper; white washable tempera paint; black tempera paint; small paintbrush.
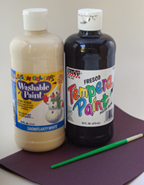
How You Make It: Set construction paper on floor. Paint child’s feet white. Have child stand on paper, keeping feet still. Then lift up child. If paper sticks, pull it straight off so it doesn’t smear. Wash feet. Once paint dries, use paintbrush to add eyes and mouth to ghost. You could also use googly eyes.
Tags: footprint crafts, footprint ghosts, footprints, Halloween
Posted in Halloween crafts, handprint and footprint crafts, Uncategorized | No Comments »
September 20th, 2007
These quick-to-make jack o’ lantern cups would be perfect for a Halloween party. Just add the kids’ names to the top part of each cup! They’re just the right size for classroom treats, too.
What You Need: orange plastic cup (Solo produces them around Halloween time, and the black cups included in the multipack are perfect for FreePreschoolCrafts.com’s plastic cup spiders.), black permanent marker, handheld hole punch, black pipe cleaner.
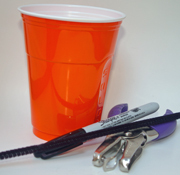
How You Make It: Just draw your favorite jack o’ lantern face on your cup! Use hole punch to punch two holes opposite one another near the top of the cup (adult may need to help with this.) Insert about 1 1/2″ of pipe cleaner into each hole and twist to secure.
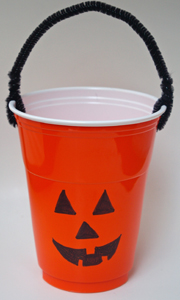
Safety Alert: Permanent markers are not nontoxic, and will mark skin, so be sure to supervise kids closely on this craft. As an alternative, you could cut shapes from black construction paper and adhere them to the cup.
Tags: Halloween, jack-o-lantern, plastic cups, pumpkin
Posted in Halloween crafts | No Comments »
September 16th, 2007
These are fun for a whole class to make. You can hang the ghosts from the ceiling, or just let the preschoolers run around with the ghosts “flying” behind them. At home, hang them around your porch.
What You Need: two plastic grocery bags; white or clear lid (such as from whipped topping or oatmeal container); two white pipe cleaners; scissors; black construction paper; glue; stapler; cellophane tape; hole punch; yarn.
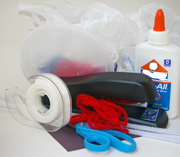
How You Make It: Cut off the bag handles as well as any writing or logos on each bag. Cut 1- to 2-inch strips from the top of bag to about 1 inch from the bottom of the bag. (Do this with both bags). Fold white pipe cleaner into seam of one bag and secure with staples. Do the same with the other bag. Now, bend each pipe cleaner/bag into a semi-circle and insert into inside rim of lid and secure with tape. Do the same with the other pipe cleaner/bag. (They will overlap a bit.) Glue on construction paper ovals for ghost eyes. Punch hole in lid and hang from yarn. Spooky!
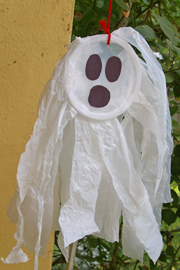
Safety Alert: Plastic bags are a suffocation hazard. Please observe children closely when making this craft.
Tags: ghost, Halloween, plastic bag crafts
Posted in Halloween crafts, recycled crafts | No Comments »


