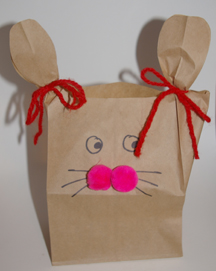
Here’s a quick, fun craft that doubles as a treat holder!
What You Need: 1 paper lunch bag; scissors; yarn; 2 pom poms or cotton balls; black marker; pencil.
How to Make It: Adult uses pencil to draw ear cut-out shape on front and back sides of lunch bag and cut along lines. Use yarn to tie ears together. Child decorates bag with marker and pom poms.
Archive for the ‘paper bag crafts’ Category
Paper bag Easter bunny
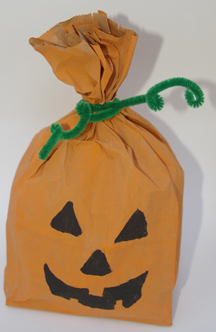
Sunday, March 16th, 2008Paper bag pumpkin for Halloween
Monday, August 27th, 2007A whole classroom could make these and then line them up along a windowsill! Try writing each child’s name on his or her pumpkin.
What You Need: paper lunch bag, orange and black tempera paints, paintbrush, rubber band, green pipe cleaner, old newspapers.

How You Make It: Paint the paper bag orange (You can just paint the front, or the whole thing). Let dry. Fill bag 2/3 full with crumpled-up newspaper. Use rubber band to close off top (Adult will probably need to help with that step). Twist green pipe cleaner around rubber band and curl ends to form stem. Decorate pumpkin with tempera paints.
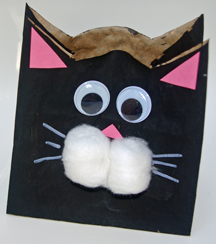
Paper bag black cat for Halloween
Thursday, August 23rd, 2007The neat thing about this craft is it can be a black cat for Halloween, a regular cat for anytime or, with longer ears, an Easter bunny! You can fill it with treats or party favors.
What You Need: brown paper lunch bag, black tempera paint, glue, two cotton balls, two googly eyes, scrap pink construction paper, light-colored gel pen or paint, paint brush, scissors.
How You Make It: Use scissors to cut two ear-shaped notches and rounded cat head shape about 6″ from bottom of paper bag. (Adult may need to do the cutting for younger children.) Paint entire bag, or just the front, black. Let paint dry. Glue on googly eyes, two cotton balls for muzzle and triangle shapes for nose and ears. Use gel pen or white paint to draw whiskers.