September 13th, 2007
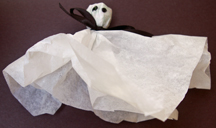
This one is definitely a classic! These little ghosts come together quickly and make for a great treat on Halloween. You could also make them using Kleenex-type tissue and yarn.
What You Need: two same-size squares of white tissue paper, a lollipop, black marker and black ribbon
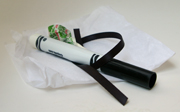
How You Make It: Stack tissue paper together, wrap around lollipop and tie with ribbon. (Preschoolers can practice bow-tying skills or a knot would be fine.) Use marker to add eyes.
Tags: Halloween, Kleenex, lollypop ghost
Posted in classic crafts, Halloween crafts, tissue paper crafts | No Comments »
September 6th, 2007
Imagine a classroom full of these spiders jiggling and dangling at Halloween time, or during a preschool theme about spiders and bugs!
What You Need: disposable plastic cup, scissors, black marker, yarn.
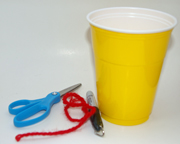
How You Make It: Using scissor points or other pointy tool, adult pokes small hole in bottom of plastic cup. Child makes spider legs by making 12 cuts from the top of the cup to about 1 inch from the bottom of the cup. (remember: Enjoy the Process! Precision isn’t a big deal.) For the eyes, cut two of the “legs” off at about 1 inch. Fold eyes upward and add eyeball using black marker. Opposite the eyes, cut off the back two “legs” so you are left with eight legs. Fold legs downward at the crease. Now, hang your wiggly spider with a knotted strand of yarn.
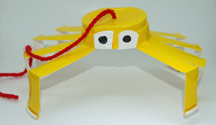
“We tried it” tip: Because this craft involves the cutting of a fairly thick cup, it might be best-suited to older preschoolers with more-developed motor skills and experience with scissors.
Suggested storybook:The Very Busy Spider by Eric Carle
Tags: Halloween, plastic cups, spider crafts
Posted in animal crafts, Halloween crafts | No Comments »
August 30th, 2007
This is a quick Halloween craft in which kids get to watch what happens as marble roll around on the paper plate and make cool patterns. This technique is also fun when you use a variety of paint colors. Besides Halloween, this craft could be used with the movie or book Charlotte’s Web .
.
What You Need: sturdy, white, high-rimmed paper plate (such as Chinet), black tempera paint, 4 to 6 marbles, plastic spider ring.
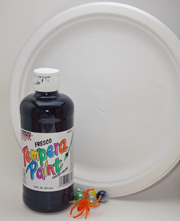
How You Make It: Apply many tiny (1/8″ or so) dots of black paint scattered around the paper plate. (Adult might need to do this for the youngest kids.) Child places marbles in plate and gently rolls them around to create web-like designs. Once dry, place or glue spider ring in plate. You can cut off the ring part if you’d like.
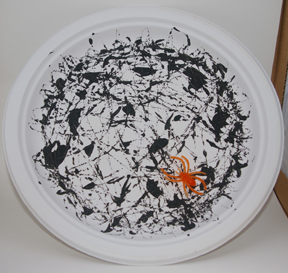
Safety Alert: Marbles can pose a choking hazard. Only do this craft with children who are developmentally ready to play with small objects.
Tags: paper plates, spider crafts, spider web
Posted in animal crafts, Halloween crafts, paper plate crafts | No Comments »
August 27th, 2007
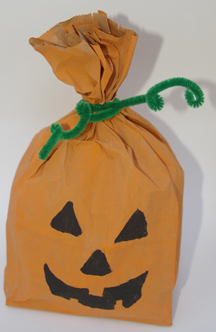
A whole classroom could make these and then line them up along a windowsill! Try writing each child’s name on his or her pumpkin.
What You Need: paper lunch bag, orange and black tempera paints, paintbrush, rubber band, green pipe cleaner, old newspapers.

How You Make It: Paint the paper bag orange (You can just paint the front, or the whole thing). Let dry. Fill bag 2/3 full with crumpled-up newspaper. Use rubber band to close off top (Adult will probably need to help with that step). Twist green pipe cleaner around rubber band and curl ends to form stem. Decorate pumpkin with tempera paints.
Tags: Halloween, paper bag crafts, pumpin
Posted in Halloween crafts, paper bag crafts | No Comments »
August 23rd, 2007
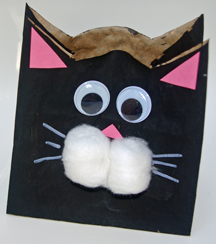
The neat thing about this craft is it can be a black cat for Halloween, a regular cat for anytime or, with longer ears, an Easter bunny! You can fill it with treats or party favors.
What You Need: brown paper lunch bag, black tempera paint, glue, two cotton balls, two googly eyes, scrap pink construction paper, light-colored gel pen or paint, paint brush, scissors.
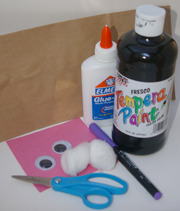
How You Make It: Use scissors to cut two ear-shaped notches and rounded cat head shape about 6″ from bottom of paper bag. (Adult may need to do the cutting for younger children.) Paint entire bag, or just the front, black. Let paint dry. Glue on googly eyes, two cotton balls for muzzle and triangle shapes for nose and ears. Use gel pen or white paint to draw whiskers.
Tags: black cat, cat crafts, Halloween, lunch bag, paper bag crafts
Posted in animal crafts, Halloween crafts, paper bag crafts | 5 Comments »


