Archive for the ‘paper plate crafts’ Category

Paper plate lion mask

Wednesday, January 28th, 2009
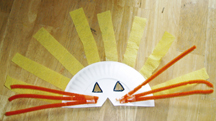
Paper plate lion

Paper plate lion

Dessert-size paper plates are the perfect size to make masks for little preschool faces. Don’t limit kids to lions; set out a variety of supplies (yarn, paint, etc.) and let their creativity go wild.

What You Need: dessert-size paper plate; yellow crepe paper; black marker; 3 orange pipe cleaners; transparent tape; scissors.

How to Make It: First adult must cut out triangles for eyes and nose and cut pipe cleaners in half. Cut crepe paper into eight strips about 5 inches long. Tape to back (curved size) of paper plate. Draw around eye holes with black marker. Tape three pipe cleaners to each side for whiskers.
Paper plate rabbit for Easter

Saturday, March 22nd, 2008

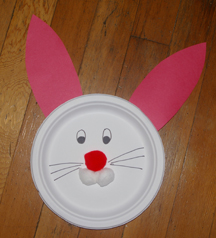
paper plate Easter bunny
This quick bunny craft is great for Easter or anytime.
What You Need: paper plate; red or pink pom pom; 2 cotton balls; black marker; red or pink construction paper; glue; scissors.
How to Make It: Cut out ear shapes and glue to back of plate. Glue on pom pom nose and cotton ball muzzle. Use marker to add mouth, whiskers and eyes.

Paper plate Valentine holder

Wednesday, February 13th, 2008

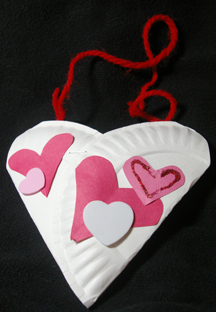
Paper plate Valentine holder heart
Let your preschoolers decorate their own Valentine holders before exchanging Valentines.
What You Need: 2 standard or dessert-size paper plates; stapler; scissors; hole punch; glue; length of red yarn; various construction paper scraps and foam hearts, glitter, etc.
How to Make It: Adult may need to assemble heart, or help the children with it. Fold both plates in half and place one inside the other. Reach in with stapler and staple together in a few places to secure. Use scissors to round edges into heart shape. Punch 2 holes at top and tie one end of yarn in each hole. Set out supplies for kids to glue onto heart!

Paper plate Christmas angel

Sunday, December 2nd, 2007

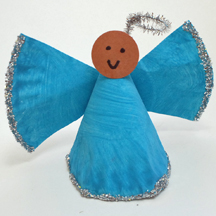
This craft is perfect for a Sunday school activity, Christmas decor or wherever you’d like a see a preschooler-created angel.
paper plate angel
What You Need: 1 1/2 small (“dessert” sized) paper plates; scrap of construction paper in skin tone of choice; blue (or other color!) tempera paint; circle punch (or just use scissors); silver glitter; 1/2 silver pipe cleaner; black marker; white glue; scissors; tape; stapler (optional).
How To Make It: Paint plates blue and let dry. Staple plate into a cone shape (adult job) or use tape. Punch head from construction paper and draw on face. Glue head to top of cone. Cut half-plate into two, creating wings. Glue or staple to back of cone body. Squeeze glue along bottom of dress and ends of wings, or just dip in a tray of glue. Then dip in or sprinkle on glitter. Bend pipe cleaner into halo shape and tape to back of dress.
Suggested Book: The Littlest Angel by Charles Tazewell

Paper plate snowy owl

Wednesday, November 21st, 2007

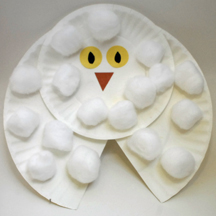
This owl is quick and easy, using affordable items you probably already have on hand.
snowy owl paper plate
What You Need: 1 regular-size paper plate and one dessert-size paper plate; cotton balls; scraps of yellow and brown construction paper; black pen; glue; scissors.
How You Make It: Cut triangle shape out of large paper plate. Glue small paper plate just above the cut-out part as shown. Cut triangle and two ovals or circles from construction paper and glue on for eyes and beak. Use black marker to add to eyes. Glue cotton balls all over and you have an owl!
Note: If you were making a different type of owl, you could glue the cut-away part of the large plate behind the small plate to make ear tufts. (Snowy owls don’t have ear tufts.) Also, how about making matching snowy owl cupcakes for a preschool theme or lesson on owls?