December 6th, 2007
Preschoolers will need some help with these dinosaur bracelets, which make great holiday gifts, if you can get the kids to part with theirs. Better make extras!
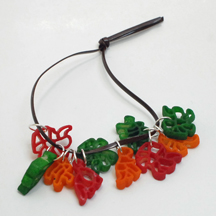
What You Need: dinosaur shaped pasta; liquid food coloring; zip-close plastic bags; plastic lace (such as Rexlace); metal jump rings (found in jewelry aisle of craft stores).
How to Make It: Separate dinosaurs equally into zip-close plastic bags. Add food coloring and a bit of water and shake to coat pasta (kids love sorting the dino shapes and shaking the bags). Let pasta dry on newspapers, stirring occasionally so they don’t stick. Once dry (adult job), carefully pry open jump rings (in a sideways motion; don’t spread them apart), thread through dinosaur and carefully close back together. String as many dinos as you’d like on plastic lace and tie to secure. (An easier alternative: Don’t use jump rings; just string dinos on lace.)
Tags: dinosaur crafts, jewelry crafts
Posted in animal crafts, dinosaur crafts, jewelry crafts, pasta crafts | No Comments »
December 2nd, 2007
This craft is perfect for a Sunday school activity, Christmas decor or wherever you’d like a see a preschooler-created angel.
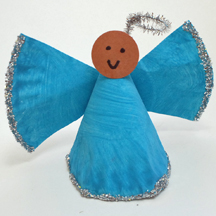
What You Need: 1 1/2 small (“dessert” sized) paper plates; scrap of construction paper in skin tone of choice; blue (or other color!) tempera paint; circle punch (or just use scissors); silver glitter; 1/2 silver pipe cleaner; black marker; white glue; scissors; tape; stapler (optional).
How To Make It: Paint plates blue and let dry. Staple plate into a cone shape (adult job) or use tape. Punch head from construction paper and draw on face. Glue head to top of cone. Cut half-plate into two, creating wings. Glue or staple to back of cone body. Squeeze glue along bottom of dress and ends of wings, or just dip in a tray of glue. Then dip in or sprinkle on glitter. Bend pipe cleaner into halo shape and tape to back of dress.
Suggested Book: The Littlest Angel by Charles Tazewell
Tags: angel crafts, Christmas crafts, paper plate crafts
Posted in Christmas crafts, paper plate crafts | No Comments »
November 29th, 2007
Add names to these Santa napkin rings and they double as a Christmas event place holder! Quick and easy to make.
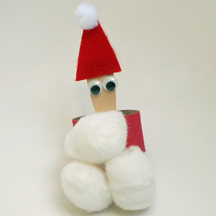
What You Need: Wooden mini spoon (in the craft sticks aisle, or they come with little ice cream tubs); 2 googly eyes; red felt or cardstock; white pom pom; 3 cotton balls; toilet paper or paper towel tube; red tempera paint; scissors; glue.
How You Make It: Adults should cut the paper tubes into sections of about 1 1/2″ ahead of time. Kids paint tube red and set aside to dry. Cut triangle shape from felt or cardstock and glue to one end of spoon. Glue pom pom (or a little bit of cotton ball) to top of hat. Glue on eyes. Glue 3 cotton balls to tube. Glue bottom of spoon inside tube. There you have it!
Tags: Christmas crafts, napkin rings, Santa crafts
Posted in Christmas crafts, paper tube crafts | No Comments »
November 26th, 2007
These cute reindeer could double as Christmas dinner place markers.
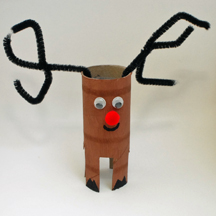
What You Need: Toilet paper tube; 2 googly eyes; red pom pom; brown pipe cleaner; brown tempera paint; scissors; glue; paint brush; black marker; transparent tape.
How You Make It: Paint toilet paper roll brown and let dry. Cut four notches (with adult help) to make four legs. With adult help, cut pipe cleaner in four pieces and wrap one piece around the other to make antler, twice. Tape inside tube. Glue on eyes and nose. Use black marker to draw mouth and hooves.
Tags: Christmas crafts, paper tube crafts, reindeer crafts
Posted in animal crafts, Christmas crafts, paper tube crafts | No Comments »
November 21st, 2007
This owl is quick and easy, using affordable items you probably already have on hand.
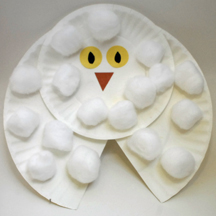
What You Need: 1 regular-size paper plate and one dessert-size paper plate; cotton balls; scraps of yellow and brown construction paper; black pen; glue; scissors.
How You Make It: Cut triangle shape out of large paper plate. Glue small paper plate just above the cut-out part as shown. Cut triangle and two ovals or circles from construction paper and glue on for eyes and beak. Use black marker to add to eyes. Glue cotton balls all over and you have an owl!
Note: If you were making a different type of owl, you could glue the cut-away part of the large plate behind the small plate to make ear tufts. (Snowy owls don’t have ear tufts.) Also, how about making matching snowy owl cupcakes for a preschool theme or lesson on owls?
Tags: bird crafts, owl crafts, snowy owl
Posted in animal crafts, paper plate crafts, winter crafts | 1 Comment »


